Introduction
About one and a half year ago we switched from native app development to React Native after some comprehensive research and comparisions.
So we have worked on the React Native for 18 months now, and we have recently released our first product, Simple Mobile CRM, which is available for free in both App Store and Google Play. Both iOS and Android versions are purely based on React Native, and no native module is used at all. You may take a look of the performance if you are interested.
So this article is not just a quick review from React Native 3-month beginners, instead we try to put some consolidated experiences here. We cannot say for sure if it’s the de-facto best practice, but we sure researched a lot and refactored a number of times during the development. These are all hard-learned lessons.

This article assumes basic knowledge of React Native and Redux. Here is a great redux tutorial if you are not yet familiar with it yet.
There are two things that must bear in mind when developing React Native,
-
Things change fast in the world of React Native. Well, programming world in general changes fast, but it’s nothing when compared to world of React Native. Most of the libraries you use, no matter how main stream it is, is likely to have big, non-backward compatible upgrade every 6 months, and usually it’s even faster than that.
-
If the app involves at least moderate complexity of data-UI interaction, you better select some sort of Redux. There are more than one library for this, but you better pick up one whenever possible.

What is Redux
Redux is a predictable state container for JavaScript apps.
Ideally, we should map the state of the running app to the redux store, in a reasonable way. There are two important questions:
- How are we going to bind each scene’s state with the redux store?
- And what is the right way to manipulate redux store?
These questions are important, not because they are difficult to Google out the resources, but because of the contrary, there are too many alternatives out there. After much time of struggling, here is what we come up eventually. And we believe this is a better way to balance the code efficiency and reliability.
In the coming sections we would build an example app to illustrate a full-blown redux, using two important libraries:
- A highly hackable routing and navigation system: react-navigation
- A powerful yet lightweight data managing/binding method: redux-orm
The full source code of the app sample could be found here:
https://github.com/bartsolutions/RNMovie
Navigation
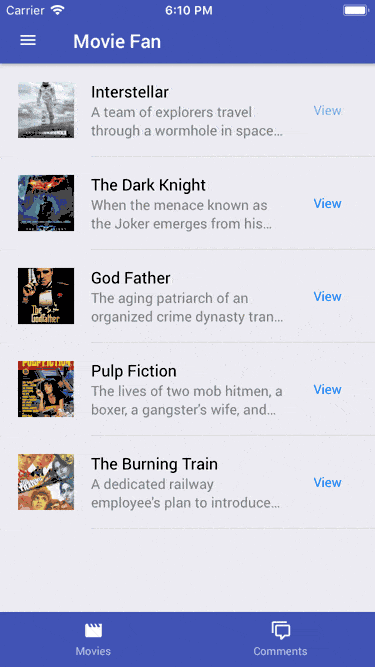
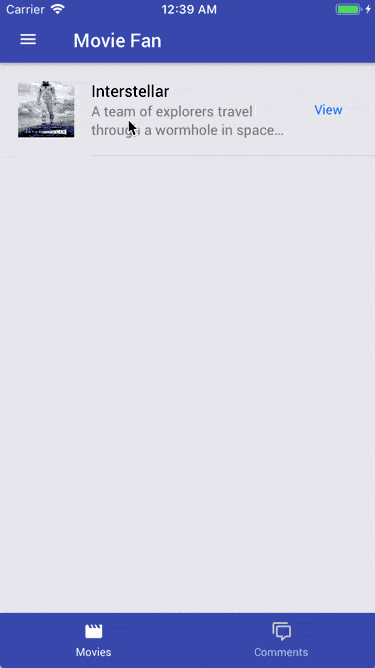
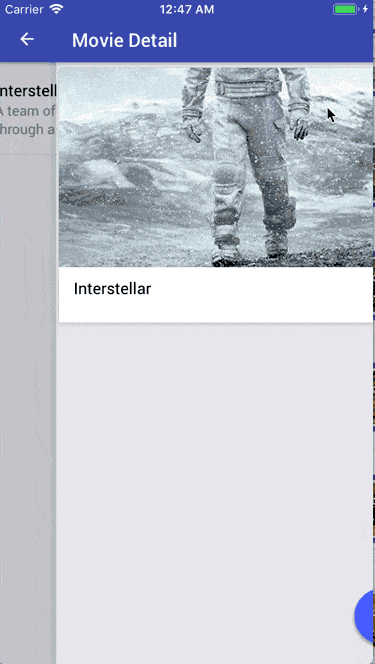
Today, we’ll build a simple app of called ‘Movie Fans’.
It will include:
- Side Bar
- Movie list page
- Movie detail page
- Movie create and edit page
- Comment List page
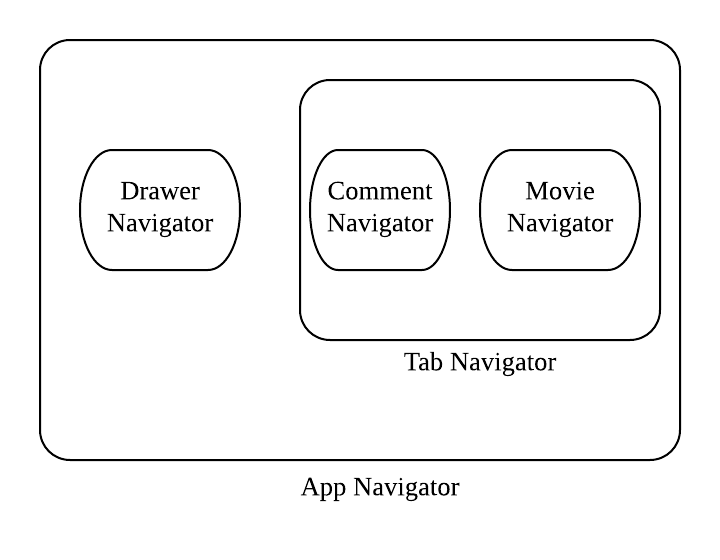
To get the general idea of this app, let’s take a look at the AppNavigator.js . The navigation related code is quite self-explanary:
import React from 'react';
import {
  createStackNavigator, createBottomTabNavigator, createDrawerNavigator
} from 'react-navigation';

import {
  movieList, movieDetail, commentList, createOrEditMovie, SideBar, TabHeader, TabBar
} from 'src/scenes';

const getNavigationConfig = title =>
   ({
     navigationOptions: () => ({
       header: props => <TabHeader {...props} title={title} />
     })
   })
;

// create navigator for movie page
const movieNav = createStackNavigator(
  {
    movieList: { screen: movieList },
    movieDetail: {
      screen: movieDetail,
      ...getNavigationConfig('Movie Detail')
    },
    editMovie: {
      screen: createOrEditMovie,
      ...getNavigationConfig('Edit Movie') },
    addMovie: {
      screen: createOrEditMovie,
      ...getNavigationConfig('Add Movie') }
  },
  getNavigationConfig()
);

// create navigator for comment page
const commentNav = createStackNavigator(
  {
    commentList: { screen: commentList }
  },
  getNavigationConfig()
);

// put movie and comment navigator into main tab navigator
const mainTab = createBottomTabNavigator(
  {
    movieNav: { screen: movieNav },
    commentNav: { screen: commentNav }
  },
  {
    tabBarPosition: 'bottom',
    headerMode: 'screen',
    swipeEnabled: true,
    tabBarComponent: props => <TabBar {...props} />,
    navigationOptions: ({ navigation }) => ({
      tabBarVisible: navigation.state.index === 0
    })
  }
);

// put main tab navigator in outmost app navigator
export const AppNavigator = createDrawerNavigator(
  {
    mainTab: { screen: mainTab }
  },
  {
    headerMode: 'screen',
    contentComponent: props => <SideBar {...props} />,
    drawerWidth: 298
  }
);

export default AppNavigator;
Here’s how the navigation looks like:
Data Strucutre with Redux-ORM
With the help of redux-orm we can define a Model for object relational mapping, similar to Django models.
Our app has two models, which are Movie and MovieComment, and they are connected using a ForeignKey.
Let’s take a quick look at models.js
import { fk, attr, Model } from 'redux-orm';

class Movie extends Model {
  toString() {
    return `Movie: ${this.title}`;
  }
  normalize() { // get the object from ReduxORM, for redux store use
    return Object.assign({}, this.ref, { // this.ref gets all fields of this object
      comments: this.comments.toRefArray()
    });
  }
}
Movie.modelName = 'Movie';
Movie.fields = {
  id: attr(),
  createdDatetime: attr(),
  modifiedDatetime: attr(),
  title: attr(),
  content: attr(),
  imagerl: attr()
};

class MovieComment extends Model {
  toString() {
    return `Comment: ${this.cotent}`;
  }
  normalize() {
    return Object.assign({}, this.ref, {
      movie: this.movie.ref
    });
  }
}
MovieComment.modelName = 'MovieComment';
MovieComment.fields = {
  id: attr(),
  createdDatetime: attr(),
  modifiedDatetime: attr(),
  comment: attr(),
  movie: fk('Movie', 'comments')
};

export { Movie, MovieComment };
Data Binding
Next thing we need to do is to bind the models with the scenes, here are the bindings we want.
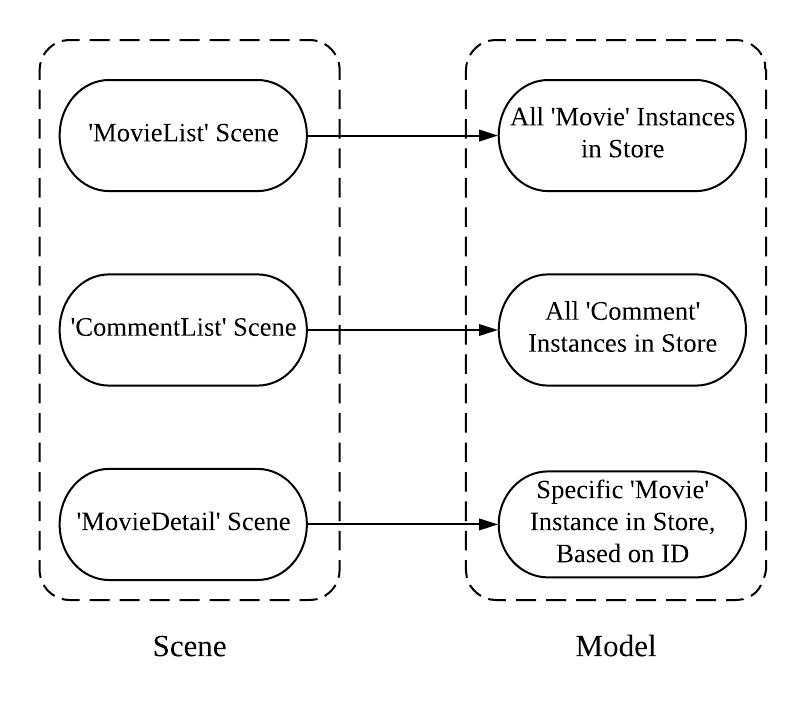
First, create selectors for the scenes (selectors.js):
const dbStateSelector = state => state.data;

// movieListSelector will be directly used in mapStateToProps of redux
const movieListSelector = createSelector(
  orm,
  dbStateSelector,
  (state, props) => props,
  (session, props) => { // you may treat session as some sort of local DB
    console.log(props);
    return session.Movie.all().toModelArray().map(movie =>
       Object.assign({}, movie.ref)
    );
  }
);

const movieDetailSelector = createSelector(
  orm,
  dbStateSelector,
  (state, props) => props,
  (session, props) => {
    // Get object ID from navigation's params
    const { navigation } = props;
    let movieDetail = { ...navigation.state.params };
    const id = navigation.getParam('id', '');

    // Filter out the movie entity and bind it with the detail page.
    if ((id || id === 0) && session.Movie.idExists(id)) {
      movieDetail = session.Movie.withId(id).normalize();
    }
    return movieDetail;
  }
);
Now, connect movieListSelector to MovieList sence (movielist.js)
class MovieList extends React.Component {
  renderItem = ({ item }) => {
    const { navigate } = this.props.navigation;
    return (
      <ListItem thumbnail>
        {/* ... */}
        <Right>
          <Button
            transparent
            onPress={() => {
              navigate({
                key: `movieDetail-${item.id}`,
                routeName: 'movieDetail',
                // Selectors will using id from params to bind the orm instance
                params: item });
            }}
          >
            <Text>View</Text>
          </Button>
        </Right>
      </ListItem>
    );
  };
  render() {
    return (
      <FlatList
        // Use data from selector to render the list
        data={this.props.data}
        renderItem={this.renderItem}
        keyExtractor={item => item.id.toString()}
      />
    );
  }
}

function mapStateToProps(state, ownProps) {
  return {
    // Bind with selector
    data: movieListSelector(state, ownProps)
  };
}

export default connect(mapStateToProps)(MovieList);
Also connect selector to MovieDetail sence (movieDetail.js)
class MovieDetail extends React.Component {
  {/* ... */}

  renderMovieDetail = () => {
    const { title, content, imageUrl } = this.props;
    return (
      <Card>
        {/* ... */}
      </Card>
    );
  }

  renderCommmentItem = ({ commentItem }) => {
    const { comment, createdDate } = commentItem;
    return (
      <ListItem avatar>
        {/* ... */}
      </ListItem>
    );
  };

  render() {
    return (
      <View style={{ flex: 1 }}>
        <FlatList
          ListHeaderComponent={this.renderMovieDetail}
          data={this.props.comments}
          renderItem={this.renderCommmentItem}
          keyExtractor={comment => comment.id.toString()}
        />
        {/* ... */}
      </View>
    );
  }
}

function mapStateToProps(state, ownProps) {
  return movieDetailSelector(state, ownProps);
}

export default connect(mapStateToProps)(MovieDetail);
As we can see:
-
The
selectorandscenewere connected viamapStateToPropsfunction, using a dynamically created selector. -
When View
buttonwas clicked inMovieListscene, a navigationparamswill be passed toMovieDetailscene so the selector can use it for the binding.
Manipulating the Redux Store
Now the scene and the store are connected via selectors. Next thing we need is to activate various actions (CREATE, EDIT and DELETE of movie and CREATE of comment), i.e. we need to manipulate the store.
How are we going to do that? Of course, use the reducers
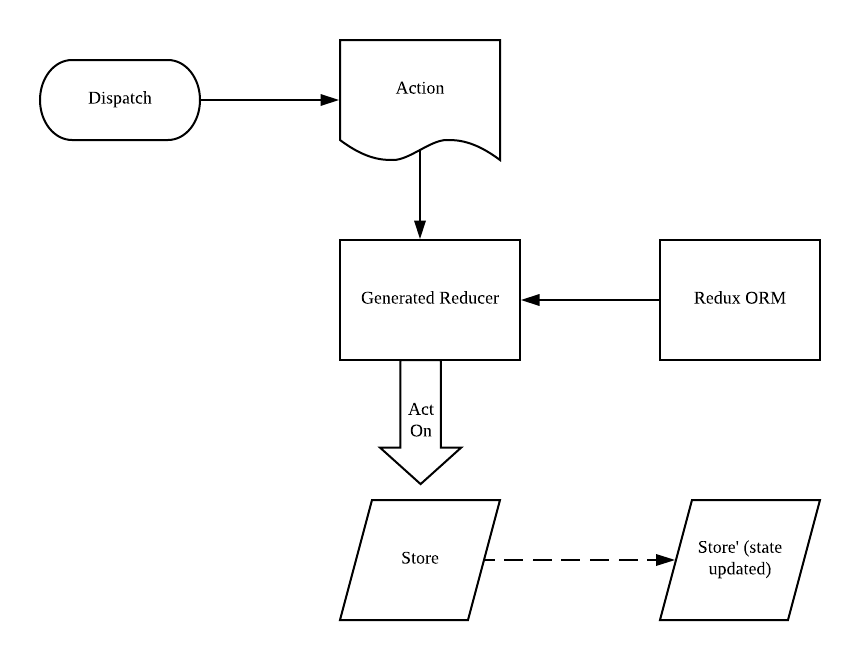
Let’s create a reducer in src/data/reducer.js first:
export const reducer = (dbState, action) => {
  let sess = orm.session(dbState);

    // Session-specific Models are available
    // as properties on the Session instance.
  const { Movie, MovieComment } = sess;

  switch (action.type) {
    case ActionTypes.CREATE_OR_UPDATE_MOVIE: {
      const { movie: moviePayload } = action;
      createOrUpdateItem(Movie, moviePayload);
      break;
    }
    case ActionTypes.DELETE_MOVIE: {
      const { id: movieID } = action;
      deleteItem(Movie, movieID);
      break;
    }
    case ActionTypes.CREATE_MOVIE_COMMNENT: {
      const { comment: commentPayload } = action;
      createOrUpdateItem(MovieComment, commentPayload);
      break;
    }
    default:
      // Nothing needs to be done, pass
      break;
  }

  return sess.state;
};
Now dispatch those actions in different scenes:
For Movie Creation or Update in createOrEditMovie.js
export default class createOrEditMovie extends Component {
  constructor() {
    super();
    this.state = {
      id: null,
      title: '',
      imageUrl: '',
      description: ''
    };
  }

  componentWillMount = () => {
    const { navigation } = this.props;
    const dbState = getState().data;
    const sess = orm.session(dbState);

    const movieID = navigation.getParam('id');
    if ((movieID || movieID === 0) && sess.Movie.idExists(movieID)) {
      const movie = sess.Movie.withId(movieID);
      const { id, title, imageUrl, description } = movie.ref;
      this.setState({ id, title, imageUrl, description });
    }
  }

  save = () => {
    const { dispatch } = this.props.navigation;
    const movie = Object.assign({}, this.state);
    if (!movie.id && movie.id !== 0) {
      delete movie.id;
    }
    dispatch({ //this triggers movie update or creation
      type: ActionTypes.CREATE_OR_UPDATE_MOVIE, movie });
    dispatch(NavigationActions.back());
  }

  {/* ... */}
}
So we can do this:

For Movie Deletion in movieList.js
class MovieList extends React.Component {
  deleteMovie = (item) => {
    Alert.alert(
      'Are you sure to delete this?',
      '',
      [
        { text: 'Cancel' },
        {
          text: 'Sure',
          onPress: () => {
            const { dispatch } = this.props.navigation;
            const { id } = item;
            dispatch({ type: ActionTypes.DELETE_MOVIE, id });
          }
        }
      ]
    );
  }

  {/* ... */}
}
So we can do this:
Create MovieComment in movideDetail.js
class MovieDetail extends React.Component {
  toggleCommentDialog = (text) => {
    this.setState({ promotVisible: !this.state.promotVisible });
    const { dispatch } = this.props.navigation;
    if (text) {
      const payload = {
        comment: text,
        movie: this.props.id };
      dispatch({
        type: ActionTypes.CREATE_MOVIE_COMMNENT, comment: payload });
    }
  }

  {/* ... */}
}
So we can do this:
Closing
Before Redux-ORM was adopted, we were using per-scene redux store. Back then every scene’s state was self-sustained. For example, the movie detail scene will have not only its own data, but also all of the related comments as well. And that causes two big headaches:
- When a new comment was created, we need to remember to update both states of comment list scene and movie detail scene. If the relation gets more complicated (Like Many-To-Many), it’s very hard to keep all the scene’s data aligned.
- Since many scenes got duplicated information the store will get bloated as time goes on.
Now:
- All data are handled and optimized by Redux-ORM, there is no (or very few) duplicated data
- A full model-based database is mapped into device, so the app appears as more responsive as most data could be collected from the local database.
- Selectors can handle the data binding automatically (even with relational data).
The full source code from this article could be found in Github.
Hope this article can bring some insights to your RN development, and stay tuned as we will share more in coming weeks.